
AI Resume Chat
I made my own AI chat application to adjust my resume for every new job I apply for.
If, like me, you have been applying for jobs, tailoring your resume multiple times to better fit the job description can get tiring. But aren’t we still unsure how effective it really is? I’m worried what questions the interviewer will ask about on my resume.
In today’s crazy competitive job market, making a resume that stands out is important. Tools like Ollama and Langchain offer nice useful AI models and tools that can not only be used to enhance your resume but also to prepare you for interviews.
Large Language Models (LLMs)
These are tools with which you may have interacted with through ChatGPT, Gemini, Claude or whatever. To use these to update a resume to get a better job we have to instruct, or prompt, them carefully. For me, it is best to make the prompt by role, task, input, and output method.
Define the role it is supposed to mimic, define its task in detail, tell what sort of inputs it should expect, and how it should give the results.
I’ve decided to take this a step further and develop my own application for my resumes.
Setup
For this application, I use the Llama3 model from Ollama with python and Langchain. Basically, this application will do these things:
- Read the job description provided
- Read your PDF resume
- Answer your questions based on your job description and resume
- Suggest modifications to your resume
- Do a mock interview
Instead of only working through the terminal, which I often do, I integrated streamlit into the AI Resume Chat application for an easier user interface.
Usage
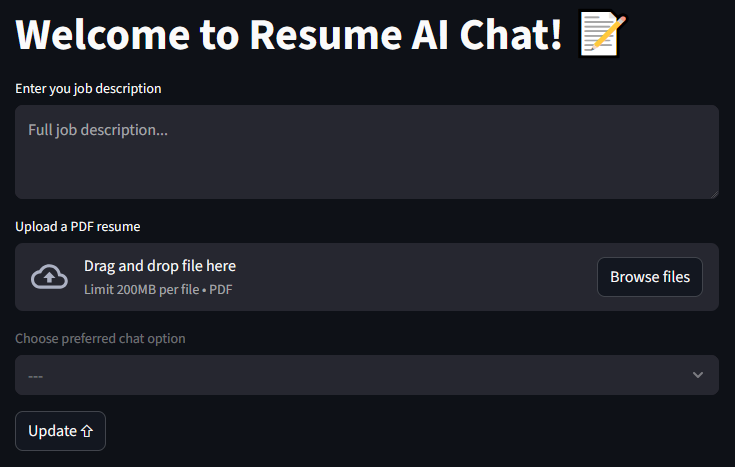
The first entry, the job description, will be a part of the system prompt itself. It is because all of the conversations will be dependent on it.
The second entry, a PDF resume, is the next part of the system prompt. RAG gets us the required snippets from the uploaded resume and, based on these, the application can extract relevant parts of the previous chat history which may be required. All of this is provided to the LLM which gives us its insights.
The third entry, a drop down, allows the selection of a chat option:
- Enhanced Resume
- Simulate Interview Both options have their own prompt, one to help enhance a resume and one to conduct an interview based on the job description and the provided resume.
After clicking the Update button the model is loaded with all of the necessary provided information. When the model is ready a new entry appears when the user can ask any questions like “How can I change my resume for this job description?”, “What is wrong with my resume?”, or “Hello! Let’s start the interview please.”
If you want to use it then please visit the GitHub repository and apply the directions in the README.md file. All of this assumes you have knowledge of using python.
Data Redaction
Using data redaction on all my repositories.
Data Redaction
The term for removing private information from code is data redaction. This technique involves masking or obscuring sensitive data within a document or dataset to protect personally identifiable information (PII) and other confidential data. Additionally, the process of hiding or removing sensitive information from documents is referred to as document redaction.
Some Traditional Methods
Let’s say we have a docker compose for a complex set of services or maybe a python program for running an AI model. We want to share the code but, we don’t want to share our local information like the internal servers being used, their ports, the website domains, user names, passwords, contact information, or more.
I won’t bother explaining docker compose yaml files and their .env and secret files but they are the best solutions. For docker compose one would use the .env and secret files that are then placed in the .gitignore file so they don’t get deployed. The .env, though in the .gitignore file, can be replaced with an uploadable example like ‘example.env’ so the one using the code can see what they need to provide. The same applies for the secret files, the secret file can have an uploadable replacement like ‘example.db_root_password.txt’. Documentation is very important.
For an application, like for python, one might use environment variables and document what they should look like so the one using the code can know what they need to complete. A simple script to launch the python application can include those environment variables like this but excluding the launching script using .gitignore…
#!/bin/bash
# File: launch.sh

GPU_BASE_URL=”MyPc1.local”
GPU_BASE_PORT=”5005”

python ./my-ai-script.py
# File: .gitignore
.env
secrets/
launch.sh
My Custom Cover-All Redaction Method
I personally have been using a custom bash script that just goes through every folder and file in the repository replacing anything private with something else. The whole redaction process can be undone using the same script. All the private information is kept in a ‘private-information.txt’ file that is never in any repository. This way all the private information is in one place and before any commit, using a git pre-commit hook, everything gets redacted.
#!/bin/bash
# File: .git/hooks/pre-commit

count=$(/scripts/search.sh | wc -l)
if [ "$count" -gt 0 ]; then
  /scripts/replace.sh ../../
fi
The information used by search.sh and replace.sh is in the ‘private-information.txt’ file. All search and replace goes in the order of the longer string to be replaced down to the smaller string to be replaced so the longer one gets matched first.
One will notice that I am using an equal sign as a separator in this example. If one wants to use this script, just use a character not likely to be redacted like a whitespace or control character i.e. \r, \n, \v, etc
Here is an example of what the private-information.txt file would look like:
amigo.lan=MyPc1.local
hermano.lan=MyPc2.local
omigo=MyPc1
hermano=MyPc2
MySecretPassword1=<password>
MySecretPassword2=<Password>
MySecretPassword3=<Pwd>
MyUserName=<login>
me@mywebsite.net=user@domain.tld
contact@mywebsite.net=name@domain.tld
support@mywebsite.net=id@domain.tld
blog.mywebsite.net=sub.domain.tld
photos.mywebsite.net=immich.domain.tld
nc.mywebsite.net=nextcloud.domain.tld
mywebsite.net=domain.tld
Pretty simple, right? The whole point is to always cover anything that needs to be redacted with the ability to undo the redaction when needed. Let’s say one has all their repositories in one ‘repos’ folder. Every repository can then be kept redacted by running this script at any time.
What are these search and replace scripts I’m talking about? See ya in the next post!
Post: Search For Redacted Data
Data Redaction - Search
Searching for private and redacted information in my repositories.
Data Redaction Search Script
One of the things I like to do when it comes to data redaction for my repositories is to check for any private information. I have this bash script called ‘search.sh’ that will search the whole folder for any private information. The script can do the opposite as well, searching for redacted information.
Please take a look at Data Redaction for the ‘private-information.txt’ that will be used here.
Sample run of search.sh
# Bad run...
/scripts/search.sh
Usage: /scripts/search.sh [option] <directory>
Options:
  -s | --swap          Search for redacted
# Search for private information
/scripts/search.sh ./

# Search for redacted information
/scripts/search.sh -s ./
For this script, since my repositories are always the same layout I define some bash variables that are easy to update. Please excuse the bad naming; they’ve been there for years.
# SECRETS is the file containing patterns to search for
SECRETS="/private-information.txt"
# EXD is a comma-separated list of directories to exclude
EXD="--exclude-dir={venv,.git,.vscode}"
# EXEXT is a comma-separated list of file extensions to exclude
EXEXT="--exclude=*.{svg,webp,png,jpg,pdf,docx,gz,zip,tar}"
# TEMPFILE is where to store the altered private information
TEMPFILE="/tmpfs/temp-patterns.txt"
Next, the script loads all the lines for the ‘private-information.txt’ file and puts them in the TEMPFILE location.
# Read in all the private information and put it all in the lines array
mapfile -t lines < $SECRETS

# For each line in the lines array we are going to create the actual
# file that will be used for searching later.
for line in "${lines[@]}"; do
  # In the example 'private-information.txt' each private and redacted
  # are separated by an equal sign
  IFS='=' read -r -a array <<< "$line"

  # Swap decides if we will use redacted or private
  if $swap; then
    echo "${array[1]}"
  else
    echo "${array[0]}"
  fi
done > $TEMPFILE
SECRETS="$TEMPFILE"
Now, we just run the grep command and see what is in there…
# There were problems with string interpolation so the script uses eval on a string
# $folder is the script parameter for the folder to search
command="grep $EXD $EXEXT -RiIFn -f $SECRETS $folder"
eval $command
The end result of running this script is either nothing or the file name, line number, and the text that matches the private or redacted information being searched for. As for replacing private with redacted; see ya in the next post!
Post: Replacing Redacted Data
Data Redaction - Replace
Replacing private or redacted information in my repositories.
Data Redaction Replace Script
It’s time to take a look at the script that will replace the private information with the redacted information. The same script can undo that switch of information making it very convenient when storing code on a remote repository without making it private. This bash script is called ‘replace.sh’ and it will search the whole folder for any private information replacing it with the redacted version.
Please take a look at Data Redaction for the ‘private-information.txt’ that will be used here.
Sample run of search.sh
# Bad run...
/scripts/replace.sh
Usage: /scripts/replace.sh [option] <directory>
Options:
  -s | --swap          Replace redacted with private
# Replace for private information with a redacted version
/scripts/replace.sh ./

# Replace the redacted version with original private information
/scripts/replace.sh -s ./
For this script, I’m adding a bash variable while the others are just like in search.sh. They are easy to update this way. Again, please excuse the bad naming; they’ve been there for years.
# SECRETS is the file containing patterns to search for
SECRETS="/private-information.txt"
# EXD is a comma-separated list of directories to exclude
EXD="--exclude-dir={venv,.git,.vscode}"
# EXEXT is a comma-separated list of file extensions to exclude
EXEXT="--exclude=*.{svg,webp,png,jpg,pdf,docx,gz,zip,tar}"
# SED_SCRIPT is the temporary sed script file
SED_SCRIPT="/tmpfs/script.sed"
This script uses the find command so we need to add the parameters to exclude the chosen directories and file extensions. I think it makes things easier to store the directories and file extensions to exclude in variables and then just generate what is needed for the find command.
This find command will be used like this…
find ./folder -type f \( ! -iname ".png" ! -iname ".zip" \) ! -path "./venv" ! -path "./.git" -print
To generate the directories to be excluded the following script is used:
# Build the exclude paths
path=""
IFS=',' read -r -a fld <<< "$EXD"
for d in "${fld[@]}"; do
  path="$path ! -path ""./${d}/*"""
done
To generate the file extensions to be excluded the following script is then used:
# Build the exclude extensions
extension="\( "
IFS=',' read -r -a ext <<< "$EXEXT"
for e in "${ext[@]}"; do
  extension="$extension ! -iname "".${e}"""
done
extension+=" \)"
This script also is going to use the sed command. Using the sed script file is best in this situation but the file has to be generated. The sed command will make changes directly to the target file while making a backup before making that change.
The sed command will be used like this…
# SED script file is, per line, like this...
# s/SEARCH/REPLACE/g

sed --in-place=.bak --file=/tmpfs/script.sed this-file.txt
To generate the SED script file we have to read the ‘private-information.txt’ and transform it taking into consideration the swap parameter. SED does not do non-regex substitutions so there will be escaping added for both private and redacted.
# Build the sed script from the secrets file
mapfile -t lines < $SECRETS

for line in "${lines[@]}"; do
  IFS='=' read -r -a array <<< "$line"

  # Swapped or not all entries must be escaped
  if $swap; then
    escaped_lhs="${array[1]//[][\\\/.^\$*]/\\&}"
    escaped_rhs="${array[0]//[\\\/&$'\n']/\\&}"
  else
    escaped_lhs="${array[0]//[][\\\/.^\$*]/\\&}"
    escaped_rhs="${array[1]//[\\\/&$'\n']/\\&}"
  fi
  escaped_rhs="${escaped_rhs%\\$'\n'}"

  echo "s/${escaped_lhs}/${escaped_rhs}/g"
done > $SED_SCRIPT
Next, we just need to get the list of files that can be modified…
# Find files, filter for ASCII, and create an array of files
command="find $folder -type f $extension $path -print"
results=$(eval $command | xargs file | grep ASCII | cut -d: -f1)
readarray -t files <<< "$results"
With the list of files that can be modified we will now apply the SED Script file to each of them.
for file in "${files[@]}"; do
   sed --in-place=.bku --file="$SED_SCRIPT" "$file"

   # Check if the file was actually modified by sed
   if ! cmp -s "$file" "$file.bak"; then
      # State which file was modified by sed
      echo "Modified $file"
   fi

   # Remove the backup copies
   rm "$file.bak"
done
And that is it. I put both search.sh and replace.sh in a git pre-commit hook. These files only need to be changed when there is a new type of folder or file type to ignore when replacing private and redacted information.
Retry Action
Let’s retry an action and maybe a function…
Keeping in mind, this particular job had a specific rule of not allowing any third-party libraries. Everything had to be done adhoc.
The Action Keeps Failing Challenge
While working with the team, I often found that tasks would fail due to other problems outside our domain. Often this was due to the SQL server timing out which we couldn’t change. There were sometimes problems where service we were relying on was slow starting up; all of our services would sleep after a mere 5 minutes.
We could just keep popping up the error notification and make the user resubmit but even I didn’t like doing that myself. I came up with an idea for going ahead and retrying until there was a definite point to give up.
A Retry Function
/// <summary>
/// Retry a failed action
/// </summary>
/// <param name="action">Action to perform</param>
/// <param name="numberOfRetries">Number of retries</param>
/// <param name="delayMs">Delay between reties. Default is no delay.</param>
public static void RetryAction(Action action, int numberOfRetries, int delayMs = 0)
{
    Exception? exception = null;
    int retries = 0;

    while (retries < numberOfRetries)
    {
        try
        {
            action();
            return;
        }
        catch (Exception ex)
        {
            // Ignore error
            exception = ex;
            retries++;
        }

        if (delayMs > 0)
        {
            Task.Delay(delayMs).Wait();
        }
    }

    throw exception!;
}
Example
public static void ThisMightFail()
{
    const int notAllowed = 1;

    Console.Write("Enter a number: ");
    var input = int.Parse(Console.ReadLine() ?? "0");

    if (input == notAllowed)
    {
        Console.WriteLine($"You number must not be {notAllowed}");
        throw new ArgumentException($"You number must not be {notAllowed}");
    }

    Console.Write("Number accepted!");
}

RetryAction(ThisMightFail /* The action to retry */,
            5 /* 5 retries */,
            500 /* 1/2 second delay */);
What It Looks Like If It Fails
Enter a number: 1
Your number must not be 1
Enter a number: 1
Your number must not be 1
Enter a number: 1
Your number must not be 1
Enter a number: 1
Your number must not be 1
Enter a number: 1
Message: Your number must not be 1
Source: RetryActionDemo
HelpLink:
StackTrace: at RetryActionDemo.Program.Main(String[] args) in ....
What It Looks Like If It Succeeds
Enter a number: 1
Your number must not be 1
Enter a number: 1
Your number must not be 1
Enter a number: 1
Your number must not be 1
Enter a number: 1
Your number must not be 1
Enter a number: 2
Number accepted!
Okay, what about parameters and return values…
public static int GetTheNumber(int notAllowed = 1)
{
    Console.Write("Enter a number: ");
    var input = int.Parse(Console.ReadLine() ?? "0");

    if (input == notAllowed)
    {
        Console.WriteLine($"You number must not be {notAllowed}");
        throw new ArgumentException($"You number must not be {notAllowed}");
    }

    Console.Write("Number accepted!");
    return input;
}

/* This is a wrapper so we can pass a parameter */
public static int ThisMightFail2()
{
    return GetTheNumber(3);
}

var res = RetryAction(ThisMightFail2 /* The action to retry */,
                      5 /* 5 retries */,
                      500 /* 1/2 second delay */);
Console.WriteLine(res);
The New RetryAction
/// <summary>
/// Retry a failed function
/// </summary>
/// <param name="fn">Function to perform</param>
/// <param name="numberOfRetries">Number of retries</param>
/// <param name="delayMs">Delay between reties. Default is no delay.</param>
public static TResult? RetryAction<TResult>(Func<TResult> fn, int numberOfRetries, int delayMs = 0)
{
    Exception? exception = null;
    int retries = 0;

    while (retries < numberOfRetries)
    {
        try
        {
            return fn();
        }
        catch (Exception ex)
        {
            // Ignore error
            exception = ex;
            retries++;
        }

        if (delayMs > 0)
        {
            Task.Delay(delayMs).Wait();
        }
    }

    throw exception!;
}
What It Looks Like If It Fails
Enter a number: 3
Your number must not be 3
Enter a number: 3
Your number must not be 3
Enter a number: 3
Your number must not be 3
Enter a number: 3
Your number must not be 3
Enter a number: 3
Message: Your number must not be 3
Source: RetryActionDemo
HelpLink:
StackTrace: at RetryActionDemo.Program.Main(String[] args) in ....
What It Looks Like If It Succeeds
Enter a number: 3
Your number must not be 3
Enter a number: 3
Your number must not be 3
Enter a number: 3
Your number must not be 3
Enter a number: 3
Your number must not be 3
Enter a number: 1
Number accepted!
1